(Polish version here // wersja po polsku tutaj)
Pattern works for any weigth of yarn. Mittens are seamless, 1st section is worked flat, 2nd - in rounds, 3rd - short rows, 4th - in rounds. Sections 2 and 4 may be any length.
You need:
-circular needles or a set of dpns, in a size appropriate for your yarn
-two stitch markers (I use big paperclips ;) )
-needle for weaving in the ends (and bind off)
-optional: crochet for making the finger loops
k - knit
p - purl
YO - yarn over
SSK - slip, slip, knit
k2tog - knit 2 together
p2tog - purl 2 together
w&t - wrap and turn, I like this method
1 - Flat section:
Cast on 3st. (Optional but recommended: leave a long tail if you want a finger loop)
Row 1 (right side): knit. (3 stitches)
Row 2 (wrong side): k1, p1, k1.
Row 3: k1, YO, k1, YO, k1. (5 stitches)
Row 4: k1, p3, k1.
Row 5: k2, YO, k1, YO, k2. (7 stitches)
Row 6: k2, p3, k2.
Row 7: k3, YO, k1, YO, k3. (9 stitches)
Row 8: k3, p3, k3.
Row 9: k4, YO, k1, YO, k4. (11 stitches)
Row 10: k3, p3, place Central Marker (CM), p2, k3.
Row 11 and further odd rows a.k.a. right side rows: knit to CM, YO, pass marker, k1, YO, knit to end.
Row 12 and further even rows a.k.a. wrong side rows: k3, purl until last 3 st., k3.
Work until diagonal of the square equals your wrist circumference (see photo below)
 |
| photo taken in the middle of a row. Diagonal (marked in red-ish) should be equal to your wrist circumference |
End with a wrong side row; distribute stitches between dpns (if you use them).
2 - In Rounds section
Next (right side) row will be the 1st Round: knit to CM, YO, pass marker, k1, YO, knit to end of row, place Beginning-of-the-round Marker (BM), do not turn - join in round.
 |
| photo taken after working 1st stitch of Round 2 |
Round 2: purl 3, knit to last 3 st before BM, purl 3.
For short mittens (like the grey ones) - go to section 3 - short rows.
For longer mittens:
Odd rounds: SSK, knit to CM, YO, pass marker, k1 YO, knit to 2 st before BM, k2tog.
Even rounds: knit.
Work until your mitten is desired length.
3 - Short Rows section:
each pair of rows is divided into 4 parts - see diagram below
1st Pair of rows
part 1 (right side): SSK, knit to 2 st before CM, w&t
part 2 (wrong side): purl to BM, do not turn.
part 3 (still wrong side): p2tog, purl to 3st before CM, w&t
part 4 (right side): knit to BM, do not turn.
2nd and all further pairs:
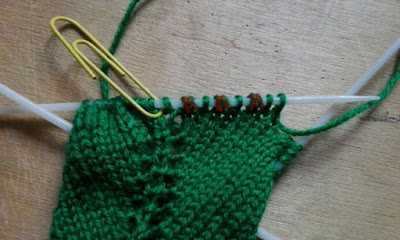
part 1 (right side): SSK, knit to 2 st before the wrapped&turned stitch of the previous row, w&t (so now you have one normal st between two w&t stitches - see photo below)
 |
| the w&t stitches marked in red-ish |
part 2 (wrong side): purl to BM, do not turn
part 3 (wrong side): p2tog, purl to 2 st before the w&t of the previous row, w&t
part 4 (right side): knit to BM, do not turn
Work until -after finishing part 4- there are 3 or less st. before the nearest w&t.
4 - Cuff is worked in rounds:
First round (right side): knit, make sure to pick up the w&t stitches. (Remove CM).
Round 2: purl
Round 3: knit
Round 4: purl.
(Repeat last two rounds if you want the cuff to be longer).
Bind off (I like this method, using a tapestry needle).
Weave in the ends.
(Optional: make a chain - about 4 cm length (that's a bit more than 1 1/2 inches) - out of the long tail left at the pointy end of the mitten and make a finger loop from it).
weave in that end and you're done :D


No comments:
Post a Comment